Gear lever: device, malfunctions and repair features.
It is impossible to imagine a car without a gear lever (hereinafter referred to as the PP lever), this detail is especially important for cars with mechanics.
Gear lever device.
In general, we can say that it is the PP lever that is responsible for choosing one or another speed for moving the car. So, it turns out that the car simply cannot drive without it.
The principle of operation of the PP lever is to tilt and move the handle in the transverse or longitudinal directions and thereby set it to the position corresponding to the required speed mode.
Gearshift drive Lada Priora.
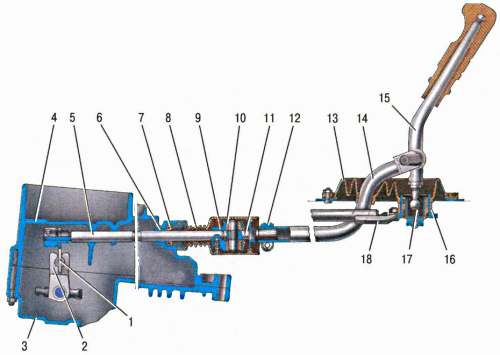
- gear selector lever
- gear selector
- gearbox housing
- clutch housing
- gear selector rod
- stem bushing
- stem seal
- protective case
- hinge body
- hinge bushing
- hinge tip
- collar
- traction protective cover
- transmission control rod
- shift lever
- ball joint
- gear lever ball joint
- jet thrust
The principle of operation of the gear lever.
The lever handle is connected by means of a fork with a synchronizer. The position of this fork conveys to the latter information about the number of the set speed. The synchronizer, in turn, sets the gearbox gears in such a way that the motor produces the power necessary to drive the car at a given speed.
Gearshift patterns for many brands of cars vary, which is why they are depicted on the lever handle.
Locations of the possible location of the PP lever in the car.
The gear lever can be located on the floor of the car or under the steering wheel. The steering column arrangement of the lever is considered more convenient for the driver, but manufacturers use the floor version much more often. This fact is explained by several shortcomings of the stalk position of the PP lever at once:
- rods wear out much faster,
- gear shifting can wedge or generally knock out,
- there is always a high probability of transmission failure,
- low definition and speed.
Therefore, the floor arrangement is considered more successful in terms of achieving the least damage.
At the same time, regardless of the location of the lever, its device is always the same, the difference is only in size. So, for example, in previously produced cars, the height of the lever could reach thirty centimeters. Today, you will meet such a value extremely rarely, because manufacturers only reduce leverage every year. And the logic here is simple: the smaller the lever, the smaller its stroke, which means that the likelihood of breakdowns and malfunctions is less.
Possible breakage of the lever.
Since the lever is practically the main part in the gearbox - if it fails, it is impossible to drive a car, its serviceability should be monitored, repairing and replacing the necessary spare parts in a timely manner. Indeed, as you know, the main reasons for the failure of this element are its improper operation and simple mechanical damage.
By the way, there are several faults that you can easily notice yourself.
- If the lever handle only moves with more force than usual from the driver's side or with some kind of binding, then it may be time to replace the ball joint or spherical washer. And with this replacement, you should not pull, it is better to do everything immediately. By the way, another breakdown “speaking” to them will be the creak that appeared when the lever handle was switched.
- In cases where the lever spontaneously bounces or turns off, you need to check the springs, it is quite possible that one of them just jumped off.
Features of the repair of the PP lever and the replacement of its parts.
If you notice any malfunctions when switching speeds, it is necessary to check and repair (replace) the corresponding parts of the PP lever. To do this, you must first make a complete removal of the latter:
- remove the cover to have access to the plastic bushings of the lever,
- unscrew the plastic protective plate to release the hinge cage;
- move aside the jet thrust and eventually remove the entire gear lever.
First you need to check the movement of the axis, if it is too free, then you will have to replace all the bushings (before installing new bushings, they are pre-lubricated with special grease).

If the spring fails, then first it will have to be pulled out of the mechanism. To do this, the hinge with a lever and the retaining ring are disassembled, the old ball joint is carefully removed (to remove it, spread the spherical washer with your fingers) and a new one is installed. Before that, it should be lubricated.
The shift lever rods change a little differently. We find a clamp at the bottom of the machine and weaken its tension. Then we unscrew the fastening nut on the hinges, disconnect the clamp. After that, you can safely get the traction and replace it with a new one. Now we collect everything in the reverse order.
And do not forget about the need for periodic adjustment of the lever!